MacOSXでDocker + GitLab日本語化まで
2016.08.24
MacOSXでDockerを始めよう。
今回はDocker Toolbox を使ってMacOSXからDockerコンテナを操作してgitlabのコンテナを立ち上げてみます。
Docker Toolboxとは
Docker社が公式で提供しているWindowsやMacなどのPCでDocker環境を簡単に構築するパッケージのこと。
EclipseでいうところのAllInOneパッケージのイメージに近い。
以下のコンポーネントがインストールされる。
- Docker Client・・・ WindowsやMacからdockerコマンドを実行できるようにする目標のコンテナ
- Docker Machine・・・ Docker Engineが動くホストをローカルやリモートに構築するもの
- Docker Compose・・・ 複数のコンテナをYAMLで管理します
- Docker Kitematic・・・ GUIでコンテナを管理する。コマンドではなく、ビジュアライズされてコンテナの管理ができる
- VirtualBox・・・ Dockerを動かすVMホスト
今回の目標
今回立ち上げるコンテナは、日本語化パッチが対応しているgitlab8.8.2を利用します。
ホスト側(Mac)の実行環境
MacOS:[~] xxxx$ sw_vers
ProductName:	Mac OS X
ProductVersion:	10.11.5
BuildVersion:	15F34
MacOS:[~] xxxx$ docker-machine version
docker-machine version 0.7.0, build a650a40
MacOS:[~] xxxx$ docker version
Client:
 Version:      1.11.1
 API version:  1.23
 Go version:   go1.5.4
 Git commit:   5604cbe
 Built:        Tue Apr 26 23:44:17 2016
 OS/Arch:      darwin/amd64

Server:
 Version:      1.11.2
 API version:  1.23
 Go version:   go1.5.4
 Git commit:   b9f10c9
 Built:        Wed Jun  1 21:20:08 2016
 OS/Arch:      linux/amd64
では、早速やってみる!
- MacOSXにDockerToolboxをインストール
https://www.docker.com/products/docker-toolbox - QuickStartから始める
“アプリケーション/Docker/Docker Quickstart Terminal”を実行すると”default”という名前のMVをVirutualBox上に作成し、
ワンクリックで起動してくれる。便利な世の中だ。Running pre-create checks... Creating machine... (default) Copying /Users/userhome/.docker/machine/cache/boot2docker.iso to /Users/userhome/.docker/machine/machines/default/boot2docker.iso... (default) Creating VirtualBox VM... (default) Creating SSH key... (default) Starting the VM... (default) Check network to re-create if needed... (default) Waiting for an IP... Waiting for machine to be running, this may take a few minutes... Detecting operating system of created instance... Waiting for SSH to be available... Detecting the provisioner... Provisioning with boot2docker... Copying certs to the local machine directory... Copying certs to the remote machine... Setting Docker configuration on the remote daemon... Checking connection to Docker... Docker is up and running! To see how to connect your Docker Client to the Docker Engine running on this virtual machine, run: /usr/local/bin/docker-machine env default
- Docker起動の確認
無事、以下のアスキーアートとIPの表示が出てきたらDocker用ホストVMの起動はOK。## . ## ## ## == ## ## ## ## ## === /"""""""""""""""""\___/ === ~~~ {~~ ~~~~ ~~~ ~~~~ ~~~ ~ / ===- ~~~ \______ o __/ \ \ __/ \____\_______/ docker is configured to use the default machine with IP 192.168.99.101 For help getting started, check out the docs at https://docs.docker.com - 続いてDockerを起動する。ToolboxでMacにインストールされるものにdockerコマンドもインストールされている。
通常Toolboxを用いないやり方だと、VMのLinuxにSSHでログインしてからdockerコマンドで操作するが、
このToolboxをMacOSXにインストールすることで、Macから透過的にVMのdockerコマンドが利用できるようになっている。
それでは、さきほどのアスキーアートが表示されているターミナルウインドウから続けて、
以下のコマンドを入力し、起動を確かめてみる。docker run --rm hello-world Unable to find image 'hello-world:latest' locally latest: Pulling from library/hello-world a9d36faac0fe: Pull complete Digest: sha256:e52be8ffeeb1f374f440893189cd32f44cb166650e7ab185fa7735b7dc48d619 Status: Downloaded newer image for hello-world:latest Hello from Docker. This message shows that your installation appears to be working correctly. To generate this message, Docker took the following steps: 1. The Docker client contacted the Docker daemon. 2. The Docker daemon pulled the "hello-world" image from the Docker Hub. 3. The Docker daemon created a new container from that image which runs the executable that produces the output you are currently reading. 4. The Docker daemon streamed that output to the Docker client, which sent it to your terminal. To try something more ambitious, you can run an Ubuntu container with: $ docker run -it ubuntu bash Share images, automate workflows, and more with a free Docker Hub account: https://hub.docker.com For more examples and ideas, visit: https://docs.docker.com/engine/userguide/ - 中ほどに”appears to be working correctly”と表示されているので、正常に動作している。
- GitLabコンテナの起動
それでは、gitlabコンテナを作成してみる。
ちなみにここでは–nameで”gitlab”とい名前をコンテナ名に指定している。
合わせてHTTPS/HTTP/SSHのポートフォワーディングさせ、ホストVM外からもアクセスできるように指定した。
22番ポートへのフォワーディングのVM側を10022としたのはホストVMが22番を使ってしまっているので変える必要がある。
gitlabは日本語化パッチが出ている8.8.2を利用する。docker run --detach --publish 443:443 --publish 80:80 --publish 10022:22 --name gitlab gitlab/gitlab-ce:8.8.2-ce.0 Unable to find image 'gitlab/gitlab-ce:8.8.2-ce.0' locally 8.8.2-ce.0: Pulling from gitlab/gitlab-ce 6599cadaf950: Pull complete 23eda618d451: Pull complete f0be3084efe9: Pull complete 52de432f084b: Pull complete a3ed95caeb02: Pull complete 661b6a5094cc: Pull complete cce048b355d5: Pull complete 32b054ed60d1: Pull complete 8aa9304d930a: Pull complete 0987e389edbc: Pull complete 737290604b01: Pull complete Digest: sha256:33f63a500c6e4139b0bda8a31617f4b28ed74257d62fd153c32a4b0a405e2eb7 Status: Downloaded newer image for gitlab/gitlab-ce:8.8.2-ce.0 799d588915033f51233e98ee1a31ec4c6b202e86901420778f1640b484948d3d
- コンテナ起動の確認
念のため、コンテナの起動を確認してみる。
プロセス一覧に”gitlab”と名前をつけたコンテナが表示されていることを確認する。docker ps CONTAINER ID IMAGE COMMAND CREATED STATUS PORTS NAMES 799d58891503 gitlab/gitlab-ce:8.8.2-ce.0 "/assets/wrapper" 5 seconds ago Up 5 seconds 0.0.0.0:80->80/tcp, 0.0.0.0:443->443/tcp, 0.0.0.0:10022->22/tcp gitlab
- gitlabの画面をブラウザから見てみる。
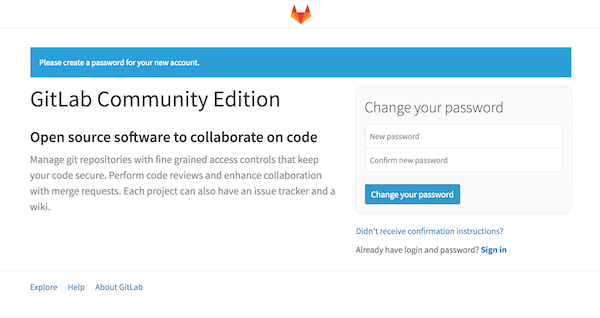
Macで適当なブラウザから”http://192.168.99.101/”を開く。
以下のようにrootユーザのパスワード設定が表示される。
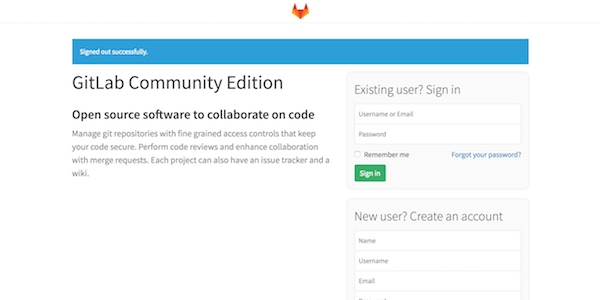
- 設定が完了すると通常のログイン画面に切り替わるので、ユーザにroot、
パスワードを先ほど設定したパスワードでログインしてみよう。
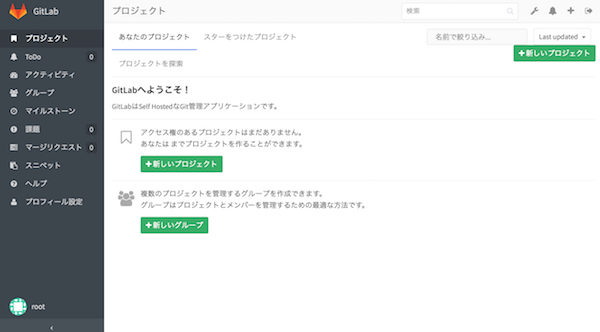
- ログインに成功すると、トップが表示されるが全部英語だ。
それでは「英語じゃわからん!」と怒られないうちに日本語化しよう。 - パッチをあてるためにコンテナに接続する。
ホストVM上やMac側から、docker attachコマンドで接続できなかったのでdocker exec -it /bin/bashで接続しbashを実行する。
本来はdocker attachコマンドでコンテナに接続できるはずだが、端末がなぜが応答しなくなってしまった。
(今回利用したdockerのバージョンはDocker version 1.11.2, build b9f10c)docker@default:~$ docker exec -it 799d58891503 /bin/bash
- 日本語化パッチをgitで取得
ホームディレクトリにクローンする。(ここは各々好きなところでOK)root@799d58891503:~# git clone https://github.com/ksoichiro/gitlab-i18n-patch.git Cloning into 'gitlab-i18n-patch'... remote: Counting objects: 3001, done. remote: Total 3001 (delta 0), reused 0 (delta 0), pack-reused 3001 Receiving objects: 100% (3001/3001), 7.94 MiB | 55.00 KiB/s, done. Resolving deltas: 100% (1583/1583), done. Checking connectivity... done.
- 日本語化パッチを適用する。
gitlab-railsに移動してパッチをあてる。
パッチコマンドの出力は長いので、途中で割愛。root@799d58891503:~# cd /opt/gitlab/embedded/service/gitlab-rails root@799d58891503:/opt/gitlab/embedded/service/gitlab-rails# patch -p1 < ~/gitlab-i18n-patch/patches/v8.8.2/app_ja.patch patching file app/assets/javascripts/lib/jquery.timeago.js patching file app/assets/javascripts/markdown_preview.js.coffee patching file app/assets/javascripts/namespace_select.js.coffee patching file app/assets/javascripts/search.js.coffee patching file app/assets/javascripts/search_autocomplete.js.coffee patching file app/assets/javascripts/stat_graph_contributors.js.coffee
- パッチ適用後に、プリコンパイルされているファイルを一度削除してプリコンパイルし直しなおす。
少し時間がかかるので気長に待つ。root@799d58891503:/opt/gitlab/embedded/service/gitlab-rails# rm -rf public/assets root@799d58891503:/opt/gitlab/embedded/service/gitlab-rails# cd /opt/gitlab/embedded/service/gitlab-rails root@799d58891503:/opt/gitlab/embedded/service/gitlab-rails# rm -rf public/assets root@799d58891503:/opt/gitlab/embedded/service/gitlab-rails# export PATH=/opt/gitlab/embedded/bin:$PATH root@799d58891503:/opt/gitlab/embedded/service/gitlab-rails# bundle exec rake assets:precompile RAILS_ENV=production I, [2016-06-26T14:06:55.930488 #18286] INFO -- : Writing /opt/gitlab/embedded/service/gitlab-rails/public/assets/print-6
- 再度gitlabをブラウザから確認してみる。
gitlabやコンテナの再起動は不要。
- まとめ。
docker-machine でvagrantを挟まなくてもMacやWindows上でdockerが気軽につかえる。
docker-machineコマンドはローカルだけじゃなくて、AWSのEC2なども直接操作できる。
gitlab以外にもredmineやmysqlなど公式のイメージがたくさんあるので、気軽にアプリを試せる。 - 注意
dockerのイメージはなるべく公式のものを。
今回の手順はあくまでテスト。コンテナを止めるとデータディレクトリはなくなるので、
データを取っておきたければvolumeオプションでホストのディレクトリをマウントしておく。
例:docker run --detach \ --hostname gitlab.example.com \ --publish 443:443 --publish 80:80 --publish 22:22 \ --name gitlab \ --restart always \ --volume /srv/gitlab/config:/etc/gitlab \ --volume /srv/gitlab/logs:/var/log/gitlab \ --volume /srv/gitlab/data:/var/opt/gitlab \ gitlab/gitlab-ce:latestgitlabの基本的な使い方はこちらを参照:
http://docs.gitlab.com/omnibus/docker/


CONTACT
お問い合わせ
あなたの「想い」に挑戦します。
どうぞお気軽にお問い合わせください。
受付時間:平日9:00〜18:00 日・祝日・弊社指定休業日は除く